Okay, so I was planning for my brother's wedding (that is 3 weeks away now), and I came up with a test design for my bridesmaid dress. Being this one:
 I took Sephora By OPI's Curve-Aceous, which matches the color of my dress almost exactly, shimmer and all, seeing as how the dress is satin.I then took my blue, red, orange, yellow, white, and black acrylic craft paints and a fine tip paintbrush, and mixed myself some paints and painted myself a nice artsy sunflower.... I then realized something. -_-Try painting something so intricate with your left hand, Jenna. Jeanyus.Then another idea occurred. Come up with a design of some sort of stick-on handmade designs, so it's still 100% my work, but each design can look equally good on both hands. Genius.My first idea was to paint clear Scotch tape with the design, then just stick it to my nail and seal it with clear polish... Then I realized that the tape wouldn't have enough texture to hold the paint in place while it was wet, so I thought for a while and came up with a solution I used to do for fun when I was younger: Glue skin.Anyone ever tried that? Put Elmer's glue on your hand and let it dry, then peel it off and it looks like you're peeling off skin.Anyway. It was perfect for the idea. It had the texture, an it was thin enough to not look too stickerish and store-bought. So I did that, and over an hour or so, I put layer after layer of white glue on the most immobile part of my arm I could and when it was thick enough, I peeled it off and painted the same sunflower design on it and very carefully cut it out. I then sealed the paint with a layer of clear nail polish and started painting a fake nail. While the polish was still tacky, I stuck the applique onto it and it stayed! So I sealed the whole thing with clear polish, and I was set. All I have to do is test out how it comes off when you want to remove it. I might add pictures of homemade applique tomorrow when I'm not too lazy to get my camera and upload the pictures.So that's my plan for the wedding. Pre-make the sunflower design so I can just stick them on after I've done the rest of the bridal party's nails.In fact, if I can do it for all of the party, that would be lovely. I'll have to talk to all of the party and see what they think.A FEW TIPS ON MAKING YOUR OWN APPLIQUES:1: After you have your glue base that you layered and peeled off your skin, put it over your nail and outline your nail so that you can see where you're painting your design, and so that if it's off-center, it will fit the curve of your nail.2: Make sure your glue base is decently thick. The thinner it is, the more easily it will rip.3: You can use Elmer's Glue-All instead of school glue. It's thicker, but takes longer to dry. On the bright side, it takes less layers.
Okay, so I was budget shopping for nail products and stuff this weekend, and I decided to share some links with y'all today to get you guys the best deals I have found on nail and cosmetic items.Makeup can be insanely expensive... I would know, I'm searching for some stuff. Dance class starts next week, and I'm looking for face makeup to at least even out the skintone... But I have a problem: To me, drug store stuff costs too much at $8... Not worth it. That's a week's allowance for one item. Tooo muuuuuch... When you're spending $10 on mascara? Come on. Really?AAAANNNYYYWAAAAYYY... This blog is on nail polish, so we'll move onto that...Nail polish can be insanely expensive... I would know, I'm always searching for a new color to add to my collection... And nail polish can be ridiculous without even being a good quality... I have found that you actually get what you pay for when you get $1 nail polishes, but I'm not saying expensive ones are better... I wouldn't know. I can't afford to spend $30 on a bottle of Chanel or MAC nail polish.So here's some nail polish links that I can recommend based off of price and selection.
1: ELF-Made famous by their $1 cosmetic items, I have watched ELF take off from the very beginning. I ordered their first nail polishes, and I have watched them expand greatly and improve flaws. ELF really listens to their customers and delivers. ELF has $1 nail polishes in a variety of colors, but be warned, these chip very quickly. If you want your manicure to last, you need to dedicate your time to it's upkeep and care. But for $1, you can afford to paint your nails every couple days, eh? Besides nail polish, they have all kinds of cool makeup to check out. I think I might have to splurge on some ELF stuff soon.http://www.eyeslipsface.com/
2: Coastal Scents. No nail polish here, but they have glitter and pigments on their site for a good price, which means that you can mix your own nail polishes by ading pigments and glitter to a clear nail polish. They also have the famous 88 pallette that you see featured in so many makeup tutorial videos. They have some awesome deals on Coastal Scents. I haven't purchased anything from them yet, but I plan on it. CS also has every makeup brush you could want, and some awesomely cool looking makeup to go with it. I have a list of things I want to get from them.http://www.coastalscents.com/cfwebstore/index.cfm
3: Dollar Nail Art. I was searching for deals on Konad stuff and other art things and happened across this site. Nail art supplies for $1 each! Between ELF and this site, you can get an aweseome manicure for only a few dollars! Sweeeet. Again, I haven't bought anything from them yet, but it looks like a good place to get some cool nail art supplies. The striping stuff and Laser Lace looks like it could make some interesting designs, the foils too, but I hear they aren't very long-lasting. I'll still try them out myself some day to make sure.http://dollarnailart.com/index.html
4: Trendy Princess. Yet another site I came across on the same Google spree that I found website #3 on. This is also a site I haven't ordered from, but I will be keeping in mind. This site has everything you could want! Even freaking glow in the dark glitter, man! Their skin moisurizing soy candles look interesting too. You melt the soy candle, then you can rub the "wax" into your skin as a moisturizer or massage oil. Huh.http://www.trendyprincess.com/home.htm
5: SmART Nails. Stencils! And not a bad price, I would say. $3? This one caught my eye a while ago, and I thought it looked interesting. I might have to order some of these some day as well... AHH, SO MANY THINGS I WANT TO GET FROM ALL OF THESE WEBSITES!!!http://www.smart-nails.com/shop.php
So there you have it. 5 websites that I've seen and have decided to pass onto you as a tip for future nail designs, even though I've only ordered from one of the 5 websites on the list...
It doesn't take skill to come up with cool designs for your nails, you just need the right tools, techniques, and a little creativity and practice.
If you have any discount cosmetic websites to share, do feel free to tell me about them in the comment box, and I'll add them on here with credit to you.Nighty-night!... Well, not for me, I'll be up for a while longer... Soooo.... Until my next post, adeiu.
I have the Glee version of Iz's "Somewhere Over The Rainbow" stuck in my head... Gee, I wonder why, eh Alfonso? (we listened to it a few times tonight after we finished ballroom dance practice)
ANYWAY!:
Water marbling! Woohoo! Messy, time consuming, tricky, unpredictable, temperamental, and requires a lot of patience and practice.Yes, this is water marbling, readers.Have some pictures:


(top:) Hippy nails, it's a bit hard to see the water marbling because of the peace signs, but you get the picture.(middle:) The best example of water marbling. Random, colorful, and each nail is unique.(bottom:) My Del Sol version of water marbling... I never got a chance to get a picture of it in the sun. *sad face* So you have to deal with the "nude" version.[click on the pictures to enlarge them]So how does one "water marble"? It's actually a simple idea, it just doesn't come off that way. Here's a tutorial. It's low-quality, but it's very clean on what to do, and it was the one I learned from: Simple Water MarblingOnce you have regular marbling down, you can move on to more elaborate stuff like this one: Fancy-Shmancy Water MarblingI still can't pull off the latter. It's very hard to do this look... At least for me. Here's the tips I can give you:
1: As the video says make sure your water is lukewarm! Cold water sets the nail polish quickly, then you just wasted a bunch of nail polish, and that sucks.
2: Use common sense- Don't use a drinking glass or anything for this. The nail polish touches the rim of whatever is holding the water, so unless you want to be removing polish from the edge of your cup, just use something disposable. I cut the bottom off of a water bottle and use that.
3: The smaller your cup, the less nail polish you will have to use. This requires a lot of nail polish as you can see from tutorial #2, so don't make yourself use more than you need. Use a smaller cup so the nail polish can't spread out as far, making you need less.
4: Work quickly!!!! The nail polish around the edges can set pretty quickly depending on the room temperature and the water temperature. Drip your polishes as quickly as possible.
5: Pick thinner polishes so that the polish will drip faster.
6: Avoid sheer nail polishes, when they hit the water, they will hardly show up at all on your nail. Pick highly pigmented ones, but make sure that the polish isn't too dense, or the drip of polish will sink straight to the bottom of your cup. Lame.
7: Paint your nail a base color, in case the water marbling doesn't get all over the nail, 'cause you can't patch water marbling. I prefer to paint my nail white before I marble, then the colors show up better anyway.8: Be patient. This will not go off smoothly every time.
9: Take into account the room temperature around you and the water temperature. The colder it is, the sooner the nail polish will set. And that sucks. I've had to remove the whole drip series because it set before I couldn't put a design in it fast enough and get my nail in there... There are some days where I simply can't do water marbling because the surrounding temperature in the room was too cool.
10: Don't try for perfection. It's not gonna happen. There will most likely be some bubbling, or some nail polish may overlap on itself when you're pulling your finger out of the water and make a gross mess, but you can either deal with it, or take it off and do that nail all over again.
11: Remember to pull the excess polish away from your nail before pulling it out of the water. The excess polish might catch on the nail on it's way out of the water, then messing up your initial design.
12: Have fun with it and try new things.
13: Keep a paper towel nearby to clean off your pin that you use to swirl your nail polish. Polish gets caught on there really easily.
14: Don't forget to clean out the excess nail polish out of your cup after each nail you marble. It's usually set by now anyway. Just take your safety pin and swirl it in the nail polish until all of it has stuck to the pin, then just wipe the polish off.
15: Give your nails time to dry. Sometimes it takes longer for your polish to dry when you water marble. Remember to shake off the water from your finger.
16: Pick very different shades of colors. My favorite combo is dark blue and neon green. I might try my most favorite color combo ever (neon green and black) sometime. I haven't tried it yet, but that may be the next option.
Well, those are all the tips I can come up with at the moment... I'll add to the list if I think of more. Just remember to be patient. I still can't do this look easily. I only do it like, once every 4 months or so. It uses a lot of nail polish, so don't use your nail polish that is running out or limited edition or something unless you're willing to sacrifice a lot of polish for a temporary look. With proper care, I'm sure this could last a while, but I change my nails once a week, so I'm not going for long-lasting... But anyway, have fun, enjoy the experience, practice it, be patient, and look at more tutorials if the ones I put up aren't clear enough. There's oodles on youtube.
As always, if you try the look, take a picture and send me a link, 'cause I wanna see! And don't hesitate to ask any questions, just check back in a few days to see if I've responded to you.
Now... I need to get to bed. I'm looking at less than 4 hours of sleep now. I have church in the morning... I knew I should have started a post on Water Marbling right before bed time. I should have been asleep 40 minutes ago... But that's okay! I'm sacrificing my sleep for you guys (you'd better appreciate it...), and I'm getting donuts tomorrow! Yaaayyy!! :D
Good morning! *falls over and passes out* ZzZzZzZzZzZzZzZzZzZzZzZzZzZzZzZzZzZzZzZzZzZzZzZzZzZzZz...
 Okay, so in the last post I covered faded nails, this time, I'm gonna cover gradient nails. This is a new technique that I tried for the first time a few hours ago. I love it, it almost looks airbrushed.<-- As you see here. (click on the picture for full size)They're patriotic because this is my weekly painting, and it overlaps with 4th Of July, therefore, it must be red, white and blue.It took me the longest time to come up with something that I liked. I even did a very time-consuming look, but didn't like it, so I had to take it all off and start over... Me and my indecisiveness. XPANYWAY! On to how to do the look.I had heard of this technique before, but hadn't really felt the need to try it until I was looking on Tumblr and saw this tutorial posted: Gradient NailsSo I decided to give it a whirl. It was simple enough. All you need is:*Nail polish colors of your choice*A foundation/cosmetic sponge*Nail polish remover*A Q-tipAll you have to do is this:* Paint your nails a base color... Or not, if you don't want to, it looks just as cool on plain nails.* Choose the first color of nail polish for your gradient and take your sponge.* Apply the polish directly to the sponge, or put some of the polish on a flat surface and dip the sponge into it. I prefer to paint it directly onto the sponge because the sponge soaks up the polish, so you would have to keep dipping it over and over... And use the corners for more precise application!* Begin patting the polish-soaked sponge onto the nail in the area you want your first color on. Mine was the red, and it got all over my fingers, but it still covered nicely. Apply as many coats as you like, I did 2-3 until I was happy with how it looked.* Repeat with the second color* Allow the polish on your nails to dry, then top with a topcoat of some sort to smooth the design. I did 2 coats to make it glossy.There you go, it's that simple! So enjoy, and be sure to link me a picture in the comment section if you try this look! If you leave a comment, check back in a day or so to see if I responded. ^-^
P.S: I got more Del Sol nail polish on my recent trip to Palm Springs! I got Island Fever, Foxy, Surfer Girl, and a backup of another color I like: Secret Crush.
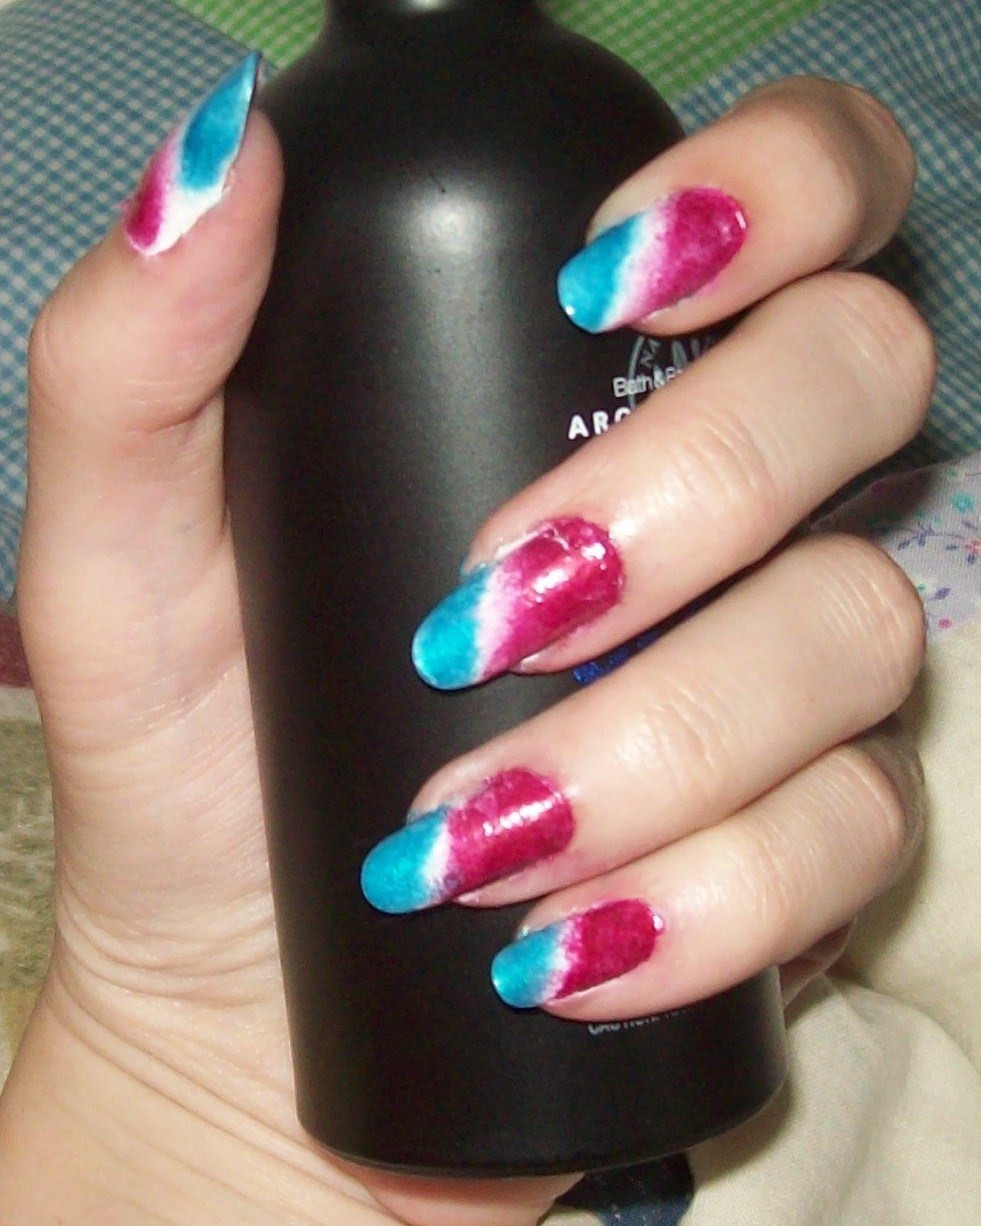
"Hello. Salute. It's me. Your duke. And I made something that's real to show you how I feel. Hello, Hello. It's me, Picasso, I will paint my words of love with your name on every wall...When you leave, my colors fade to grey. Little lover stay, all my colors fade away. Every word of love I used to say, Now I paint it every day... Mya-hee, Mya-hoo, Mya-ha, Mya-ha-ha!..." *ahem* I like that song... Dragostea Din Tei in english... ANYWAY!... Speaking of fading colors, on to the topic of the day! Blended colors!As those of you from DeviantArt know, this is my most recent blended look. I did this last week, and it seemed pretty popular.
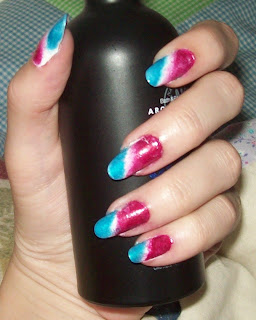
 But I also did this look a few months ago, and it was by far the most popular look I've done. People loved it... And a couple were bummed when I took it off to do a different look.(click on photos for full size.)So anyway, how do you do it? I got that question a few times, and it's hard to describe exactly how to do it other than showing the video I found on how to do it, found here: Jolleh8D's nail polish blending tutorial
No, I did not come up with the idea alone, someone else did, and I just used the tutorial they made to create a very popular look. All I can offer are tips and tricks to make the process easier for newbies:
1: Use a nail polish that is sheer enough to allow the color it overlaps on to show through, but make sure that the polish isn't so sheer that it doesn't alter the color it's fading into, 'cause then it takes forever to get it to work and usually requires a million coats, earning you a very long drying time.
2: Fade two similar colors together, it makes it easier. I tried to fade green into pink and ended up with an embarrassing and ugly mess that I won't post on here. You can find it on my DA account.
3: Cremes are harder to fade because of their opacity. If you want to use cremes, you need to actually mix the colors together where they meet, so be willing to work for it.
4: Texture is important as well. If the polishes are a different texture, it will be more difficult to blend it, but could also yield awesome results if it works out.
So there you have some tips and advice to hopefully make your blending experience go smoothly. I find that Sally Hansen Hard As Nails Xtreme Wear nail polish is awesome for blending. It's a good consistency for blending, and there is a wide variety of colors to choose from.
Here's some options that you could try using this technique:
*Try doing it in different directions. Horizontal, diagonal, vertical...
*Try fading different shades of the same color.
*Try fading different colors on each nail.
*Try doing a faded french manicure by fading nail polish on the tips of your nails, then shaping it into a french manicure by using a nail polish remover-soaked Q-tip to remove any excess and shape it just how you want it.
*Add a cool topcoat to add some extra pizazz. Try a tinted topcoat, glitter, a mattifying topcoat, or glow in the dark nail polish. I also have blacklight reactive nail polish that I would like to use sometime... But I'm not quite the rave/clubbing type, haha. I'll have to go to an arcade or Killer Pizza From Mars sometime.
*Try doing a Yin/Yang design with a solid color on one side, and faded colors on the other.
*Add in black as an accent color to your faded colors design.
So get to it, dear readers! Send me a link to a picture of your design in the comment section if you attempt it, and don't hesitate to ask if you have any questions about something I didn't cover or wasn't clear on anything. I'll add a comment answering your question as soon as I can, so check back to see if I responded to your comment!
Okay, so I figured that I would start off this blog telling you what I have in my nail art inventory... More like my obsession after I listed and counted everything I've collected over the years... I will try to keep this post updated as long as I remember
... I have 101 bottles of nail polish, and 148 nail polish items in all...
Okay, so I'll go by company names...
NAIL POLISH:
Sephora by OPI:
Base Coat
Top Coat
Curve-aceous
Personal Shopper
Dear Diary
I'm With Brad
Set The Mood
Wardrobe Change
Nicole by OPI:
Poised In Turquiose
NYC:
Big Apple Red Creme
Black Lace Creme
Big Money Frost
Purple Pizzaz Frost
Charming Rose Creme
Starry Silver Glitter
White Lights Glitter
Times Square Tangerine Creme
Del Sol:
Calypso
Superhero
Pretty In Pink
Heartbreaker
Secret Crush
Sun Kissed
Spanish Flirt
Reckless
Ruby Slipper
Spike
Electrick
Peek-A-Boo
Rock Star
Surfer Girl
Island Fever
Foxy
E.L.F.:
Pearl
Bubble Gum Pink
Light Pink
White
Maggie's Pink Slipper
Sally Hansen Hard As Nails Extreme Wear:
Ocean View
Lime Lights
Deep Purple
Purple Potion
Disco Brites UV Reactive Nail Color:
Funkadelic
Turntable
Strobe Light
Astral Lights Glow In The Dark Nail Paint:
Green glitter
Orange glitter
Purple glitter
Sally Girl:
U Glow
It's So Me
U Betcha
Unnamed emerald shimmer
Unnamed neon pink creme
Unnamed neon purple creme
Milani:
Green Glow
Lemongello
Bari Cosmetics Pure Ice:
Heart Breaker
Hot Topic Bloody Mary:
Unnamed dark neon blue
Maybelline Express Finish 50 Second Color:
Base & Top Coat
Revlon:
Gold Get 'Em
Silver Screen
ORLY:
Shine On Crazy Diamond
Nina Ultra Pro Salon Formula Nail Lacquer:
Pucker Up
Solar FlairIcing By Claire's:
BedazzledBlackout
Bon Bons:
Unnamed light blue shimmer
Unnamed pink glitter
Unnamed orange glitter
Unnamed purple duochrome shimmer
(old bottles) Wet 'N' Wild:
431B
431C
456E
425A
(old bottle) Essie Cosmetics:
Sentimental Red
(old bottles) Cover Girl Nail Slicks:
China Coral
Rambling Rose
Misty Mauve
(old bottle) Loreal Grow Strong:
Mauve Dure
(old bottle) Brucci Nail Hardener:
#29
Generic nameless colors:
Dark wine shimmer
Cherry red shimmer
Dark mauve shimmer
Neutral pink shimmer
Light baby pink shimmer
Pale pink shimmer
Grey duochrome shimmer
Hot pink shimmer
Fire engine red shimmer
Dark rose duocrome shimmer
Grey glitter
Nameless NYC teal/blue shimmer
Light purple glitter shimmer
Mint green shimmer
Light orange shimmer
Peppermint red shimmer
Baby pink glitter shimmer
Gingerbread shimmer
Frankenpolishes (home mixed polishes):
Turquoise
Starry Night
Malibu
Twilight
TOOLS:
Migi Nail Polish Pens:
Gold Set
Silver Set
Bronze Set
White Set
Black Set
Konad Gold Kit, containing these colors of special polish:
White
Pearl Pink
Red
Blue
Green
Yellow
Black
 Hello, all! I have a blog now, it seems, so I'm sitting here figuring out how everything works and setting up my profile template.So to get a post on my wall, I'm gonna throw on a photo of me.... Yes, this is me. Say hi!HAI! :DAnyway.This blog was started at the suggestion of one of my watchers on DeviantArt.com, so here it is! A blog for me to share tips, tricks, techniques, pictures, reviews, and tutorials for all kinds of nail polish designs. ^-^I'm just bummed that I can't reply to comments on my posts. That's no fun. :(Now if you'll excuse me, I must go edit my template some more.